Subsections of newsletter software settings
GroupMail

GroupMail > Tools
Manage Accounts > New
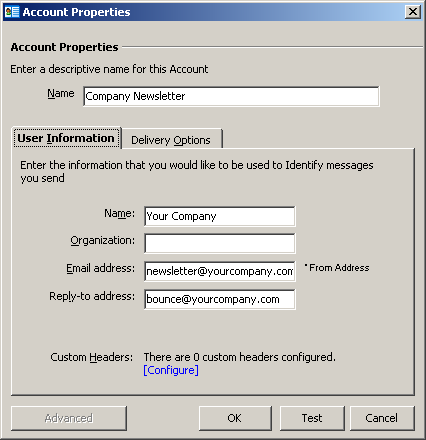
Account Properties
Name / User Infomation:
fill in the form with your company’s data

Delivery Options
Delivery Options: Standard
SMTP Server: rsxxx-realsender.com
[x] Requires Authentication
[setup]
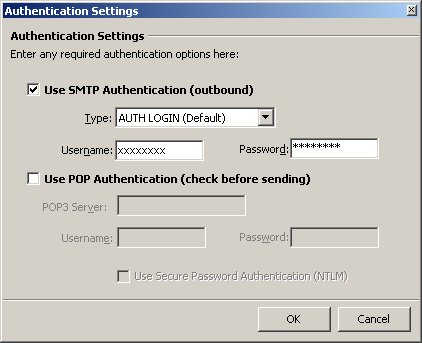
Authentication Settings
[x] Use SMTP Authentication (outbound)
Type: AUTH LOGIN (Default)
Username: (the one we sent you)
Password: (the one we sent you)
[OK]
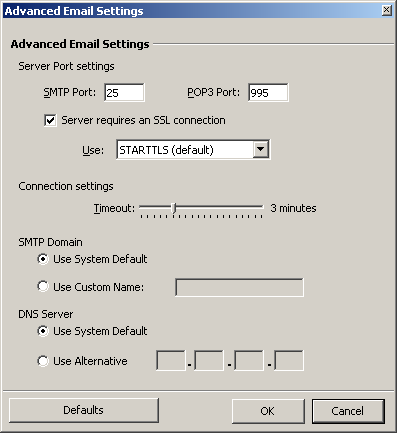
Advanced Email Settings
SMTP Port: 25
[x] Server requires an SSL connection
Use: STARTTLS (default)
[OK]
Inxmail Professional

Global Settings > Administration
> Mail Server > Sending Emails
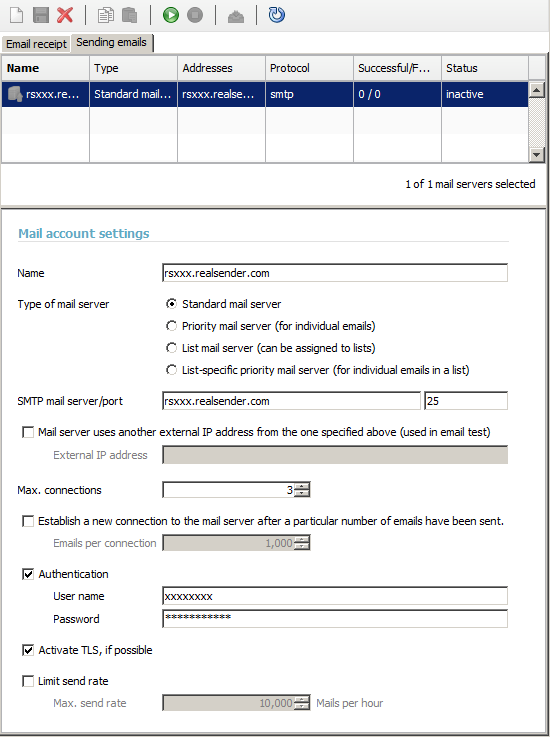
Mail account settings
Name: rsxxx.realsender.com
SMTP mail server: rsxxx.realsender.com - Port: 25
Max. connections: 3
[x] Authentication
User name: (the one we sent you)
Password: (the one we sent you)
[x] Activate TLS, if possible
[Save]
[Activate connection to the mail server account]
Joomla AcyMailing


Joomla > Components
AcyMailing > Configuration
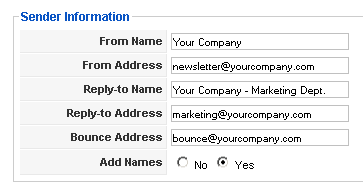
Sender Information
fill in the form with your company’s data
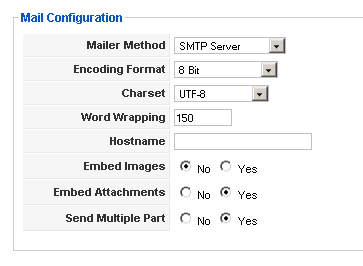
Mail Configuration
Mailer Method: SMTP Server
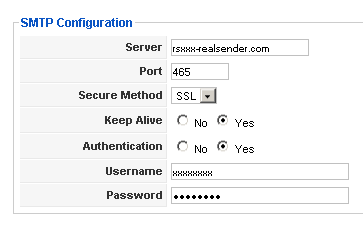
SMTP Configuration
Server: rsxxx.realsender.com
Port: 465
Secure Method: SSL
Keep Alive: [x] Yes
Authentication: [x] Yes
Username: (the one we sent you)
Password: (the one we sent you)
MaxBulk Mailer
[Settings]
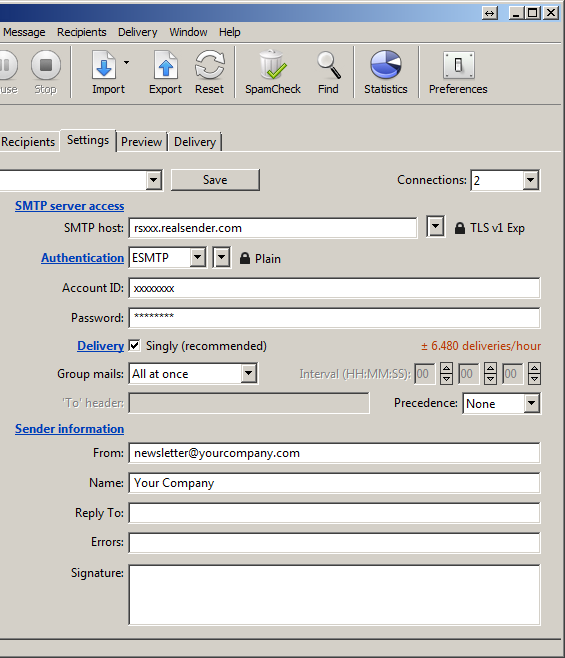
Settings
Connections: 2
SMTP server access
SMTP host: rsxxx.realsender.com - TLS v1 EXP
Authentication: ESMTP - Plain
Account ID: (the one we sent you)
Password: (the one we sent you)
Delivery: [x] Singly (recommended)
Group mail: All at once
Sender information
From: (the sender email address)
Name: (the sender description)
Drop down menu (top left)
[Save new account as…]
Name: rsxxx
[Create]
phplist

Configuration tested on:
phplist, version 3
Attention: make a backup copy before making
any changes on your phplist server configuration files
phplist config

Fill phplist/htdocs/config/config.php
with the correct data:
[…]
define(‘PHPMAILERHOST’, ‘rsxxx.realsender.com’);
[…]
define(‘PHPMAILER’,1);
define(‘PHPMAILER_SECURE’,‘TLS’);
$phpmailer_smtpuser = 'the one we sent you';
$phpmailer_smtppassword = ’the one we sent you’;
$phpmailer_smtpport = 587;
$pageroot = ‘/’;
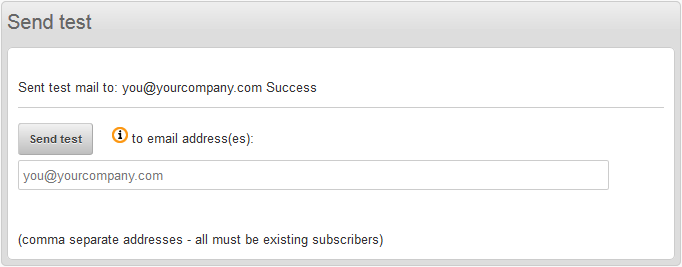
Send a test message (phplist > Campaigns > Send a campaign > Send test):
SendBlaster

Messages > Send
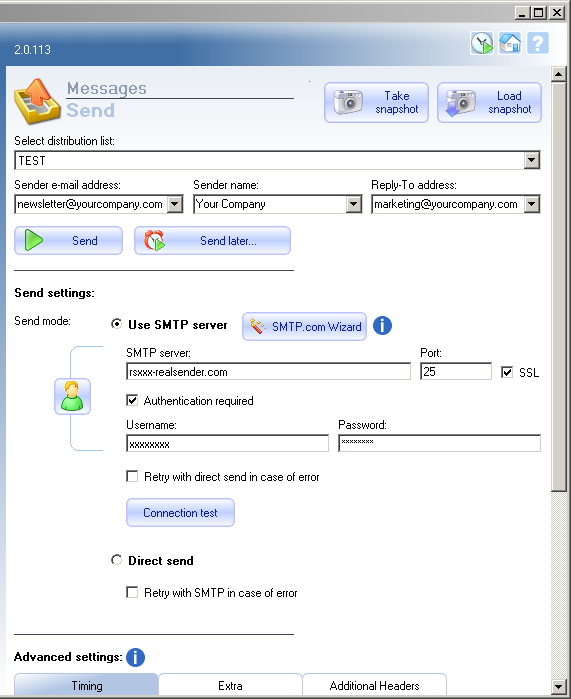
Send settings:
Send mode: [x] Use SMTP server
SMTP Server: rsxxx.realsender.com
Port: 25 - [x] SSL
[x] Authentication required
Username: (the one we sent you)
Password: (the one we sent you)
[Take snapshot]
Sendy

Sendy

Select a brand > [Add a new brand]
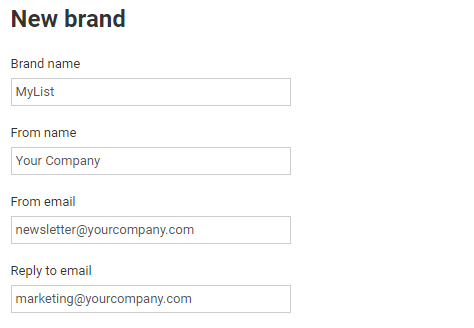
New brand
Brand name
From name
From email
Reply to email
(fill the form with the list name and your company’s data)

SMTP settings
Host: rsxxx.realsender.com
Port: 587
SSL / TLS: TLS
Username: (the one we sent you)
Password: (the one we sent you)
[Save]
WordPress MailPoet 3

WordPress
MailPoet > Settings
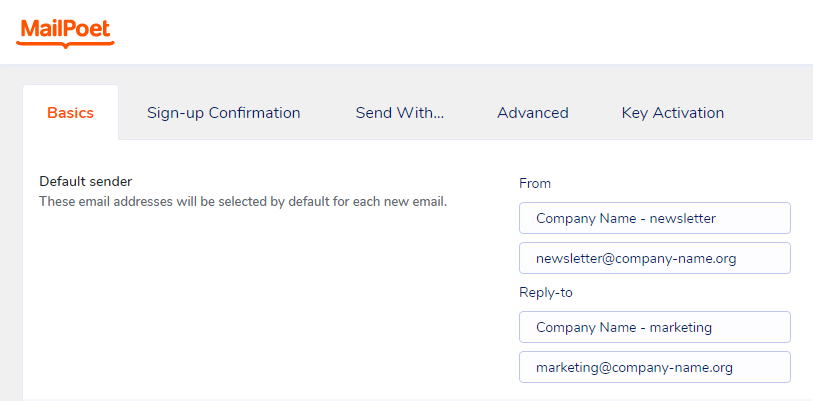
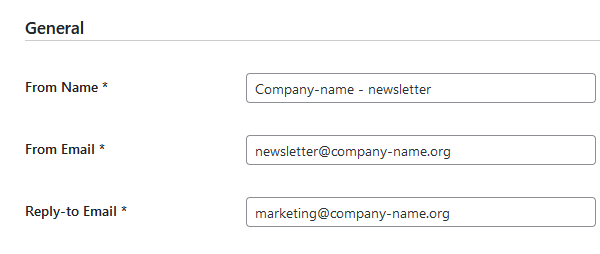
Basics > Default sender
(fill the form with your company’s data)
From:
Company Name - newsletter (description)
newsletter@company-name.org (email address)
Reply-to
Company Name - marketing (description)
marketing@company-name.org (email address)
[Save settings]

Send With…
[x] Other
Send emails via your host (not recommended!)
or via a third-party sender.
[Configure]
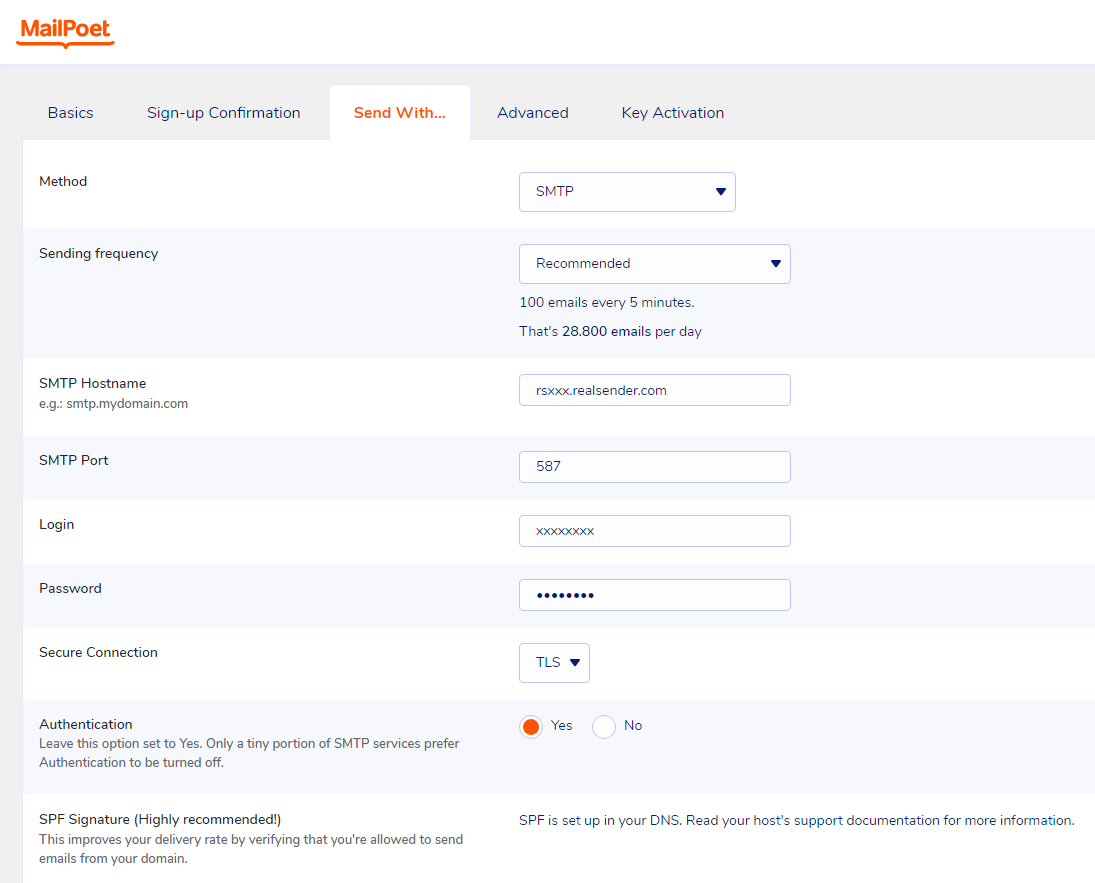
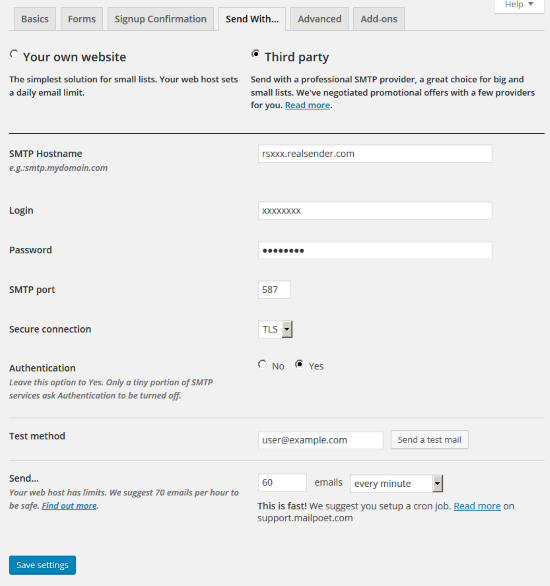
Send With…
Method: SMTP
Sending frequency: Recommended
(100 emails every 5 minutes. That’s 28.800 emails per day)
SMTP Hostname: rsxxx.realsender.com
SMTP Port: 587
Login: (the one we sent you)
Password: (the one we sent you)
Secure connection: TLS
Authentication: [x] Yes
[Save settings]
For Premium features and support, on the Mailpoet pricing page
choose the “I just want the Premium with no sending” option.
In this way you can continue to use RealSender,
combining it with a dedicated email address to receive the bounces.
The “Bounce Handler Mailpoet” plugin will also have to be installed.
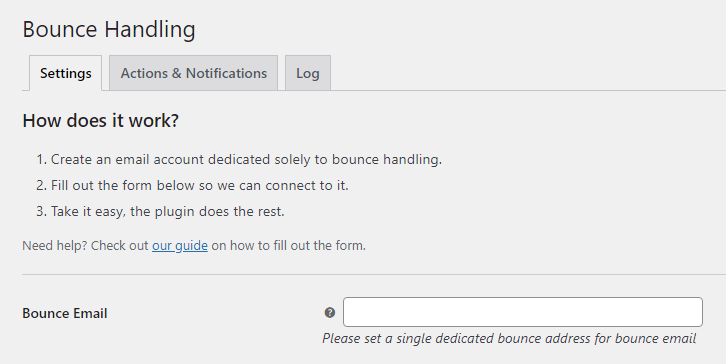
Bounce Handling
Bounce Email:
Please set a single dedicated bounce address for bounce email
please contact our support team to [get the mailbox to receive the bounced messages](../../bouncehandler-app/newsletter-mailboxes)
WordPress MailPoet 2

WordPress
MailPoet > Settings
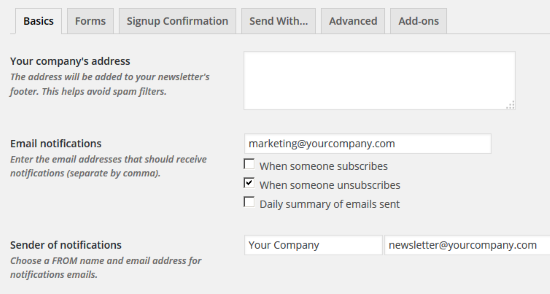
Basics
Email notifications:
fill with the proper email address
Sender of notifications:
fill with the newsletter’s
FROM name and email address
[Save settings]
Send With…
[x] Third party
SMTP Hostname: rsxxx.realsender.com
Login: (the one we sent you)
Password: (the one we sent you)
SMTP Port: 587
Secure connection: TLS
Authentication: [x] Yes
Send… 60 emails every minute
[Save settings]
WordPress MailPress

WordPress > Plugins
MailPress > Settings
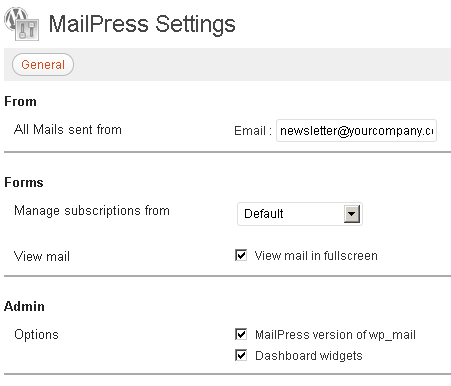
General
From - All Mails sent from:
fill in the form with the sender’s email address and name
if it’s your first MailPress setup
you must press [Save Changes]
to see the additional settings options (SMTP, Test, Logs)
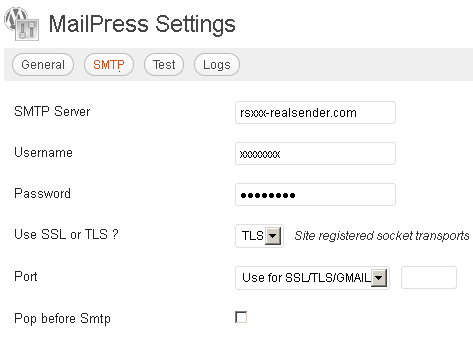
SMTP
SMTP Server: rsxxx.realsender.com
Username: (the one we sent you)
Password: (the one we sent you)
Use SSL or TLS ? TLS
Port: Use for SSL/TLS/GMAIL
WordPress Mailster

WordPress
Settings > Newsletter
General
From Name:
From Email:
Reply-to Email:
(fill the form with your company’s data)
[Save Changes]

Delivery Method
[SMTP]
SMTP Host : Port rsxxx.realsender.com : 587
Timeout: 10 seconds
Secure connection: [x] TLS
SMTPAuth: Plain
Username: (the one we sent you)
Password: (the one we sent you)
[Save Changes]
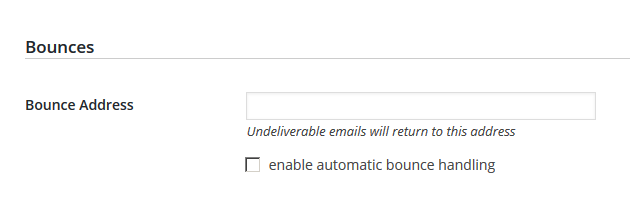
Bounces
Bounce Address:
Undeliverable emails will return to this address
please contact our support team to [get the mailbox to receive the bounced messages](../../newsletter-mailboxes)